
QUIC.cloud brings a plethora of new features and performance to WordPress websites. One of its major features is that it helps you to improve your SEO by improving your website’s Time to First Byte (TTFB), which will help Google to open your website faster and get it a better ranking.
Today, we’re pleased to show you a feature which takes our dream of making WordPress websites faster even further, and that is Cloudflare Integration: a 10-minute setup to shift your website to QUIC.cloud while using Cloudflare’s DNS.
This feature will allow new users coming from Cloudflare to take advantage of super-fast caching and TTFB benefits that QUIC.cloud CDN provides, all with an easy setup.
Prerequisites
To start with this you’ll need:
1 – A domain registered at Cloudflare, or using Cloudflare’s Nameservers
2 – Access to the domain’s Cloudflare account to create API keys
3 – WordPress with the LiteSpeed Cache plugin installed on the same domain
Note: By the end of this tutorial, your website will be using QUIC.cloud CDN, while still utilizing Cloudflare DNS. This will not change your DNS servers, nor require you to change your nameservers or cause any downtime during propagation.
Now that we’ve talked basics, let’s move ahead.
Step 1: Take TTFB Measurements
Let’s ensure that the requirements are ready, and take some TTFB measurements too.
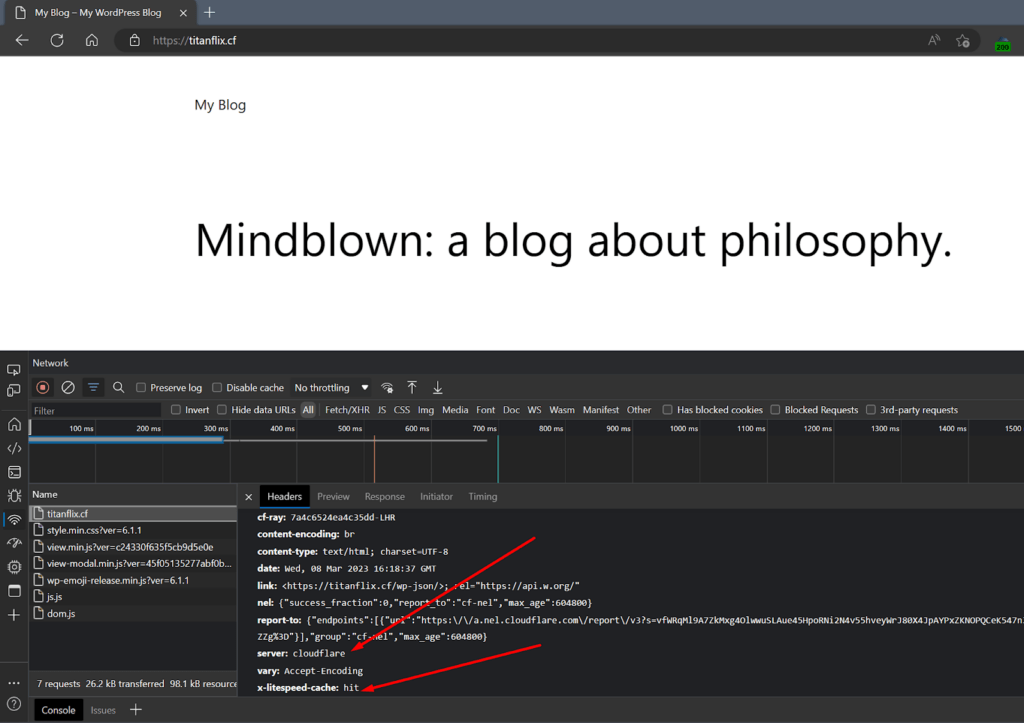
In the above screenshot, the x-litespeed-cache : hit header confirms that Litespeed Cache is installed and working correctly, and server: Cloudflare shows it is currently using Cloudflare CDN.

The TTFB for this cached LiteSpeed request using Cloudflare’s CDN is 231ms.
231ms is kinda alright for now, since the server where this website is hosted and my browser are about 13000 kms away from each other.
But don’t worry, This is what QUIC.cloud is known for and we’re going to make this distance not matter at all using QUIC.cloud CDN.
Step 2: Link Domain to QUIC.cloud
Now we will enable QUIC.cloud services in the Litespeed Cache plugin, and link the domain to a QUIC.cloud account.
Visit LiteSpeed Cache > General > Online Services and click the Enable QUIC.cloud services button. You will be walked through the process of creating a new my.quic.cloud account for this domain, or adding the domain to an existing account.
When prompted to Enable CDN or Finish Link Setup, click the Finish Link Setup button.
If you run into any problems at this stage, please contact our Support Team for assistance.
Step 3: Cloudflare Integration
Now we have the domain ready to be enabled with QUIC.cloud CDN, and this is where the main part comes in: to link Cloudflare’s DNS with QUIC.cloud CDN and make them work together, automatically.
At QUIC.cloud
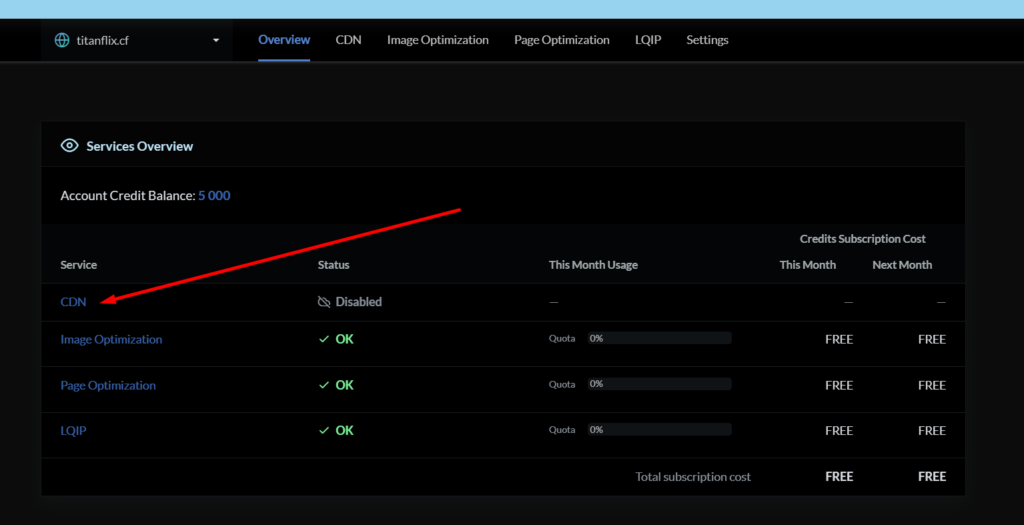
Access your QUIC.cloud Dashboard at https://my.quic.cloud, log into the account where the domain is linked, click the domain name, and then click CDN.
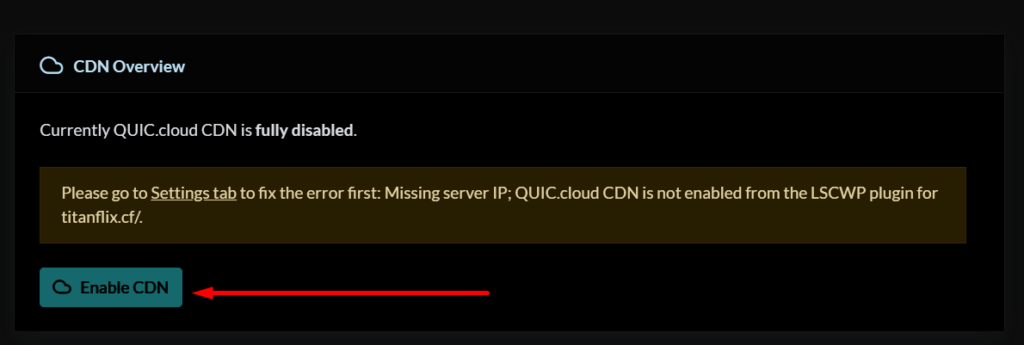
Once there, deal with any configuration issues that might be listed above the Enable CDN button, and then click the button when ready.
In this example, the screenshot shows that I was required to first set the domain’s Server IP (found in the Settings section, in the top navigation menu of the same CDN page). I also needed to enable the QUIC.Cloud CDN in WordPress Admin > Litespeed Cache > CDN.
I did those steps and then clicked Enable CDN.
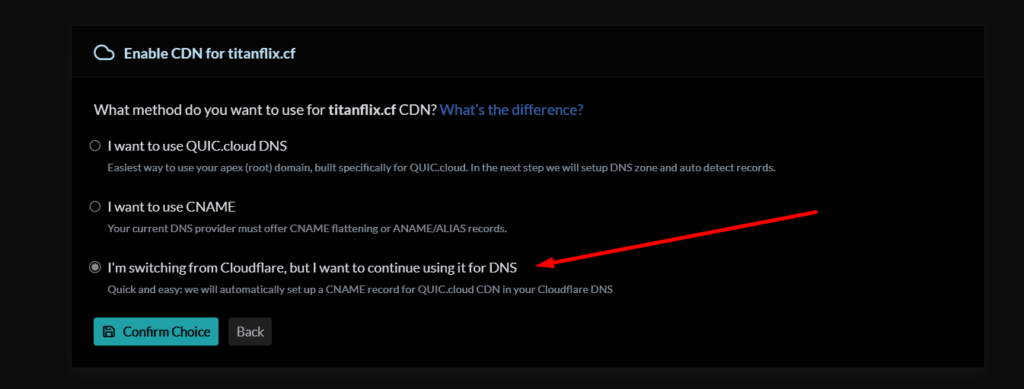
You will be asked which DNS method you’d like to use. Choose the option that says I’m switching from Cloudflare, but I want to continue using it for DNS. This option will enable Cloudflare Integration and automate all DNS changes.
At Cloudflare
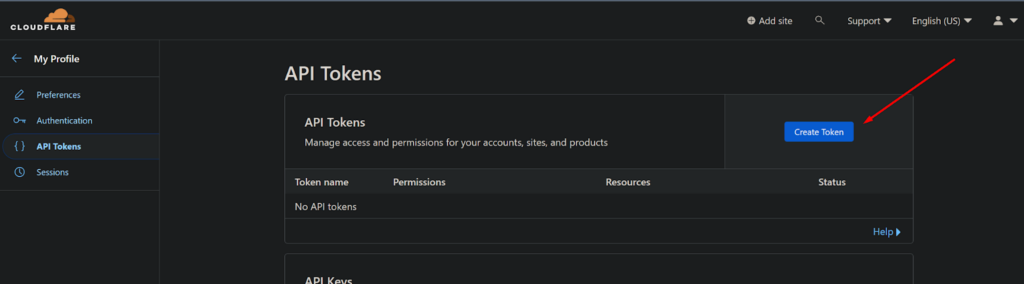
On the next step, when QUIC.cloud asks you for the API Token, open another browser tab, go to your Cloudflare Account, and navigate to My Profile > API Tokens > Create Token.
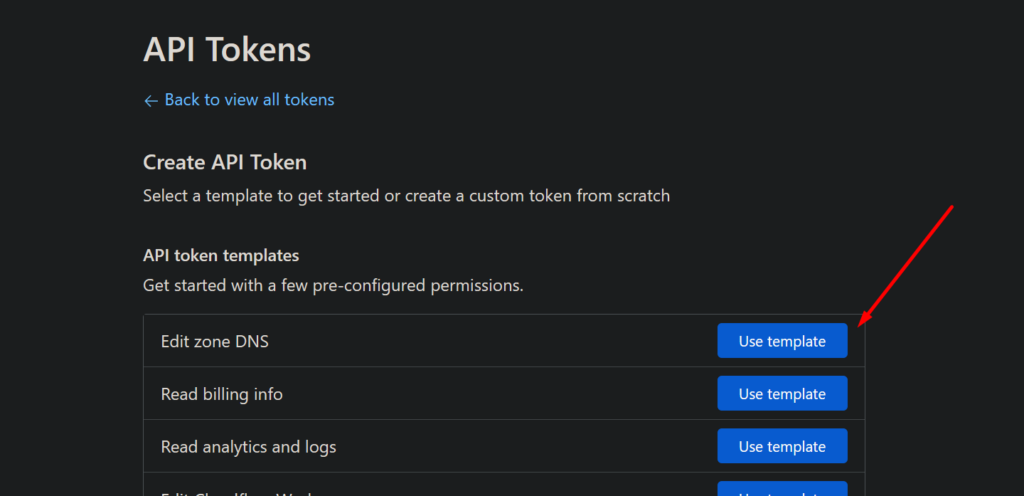
Select the Edit zone DNS template. This gives QUIC.cloud access to edit the DNS Zone for your domain.
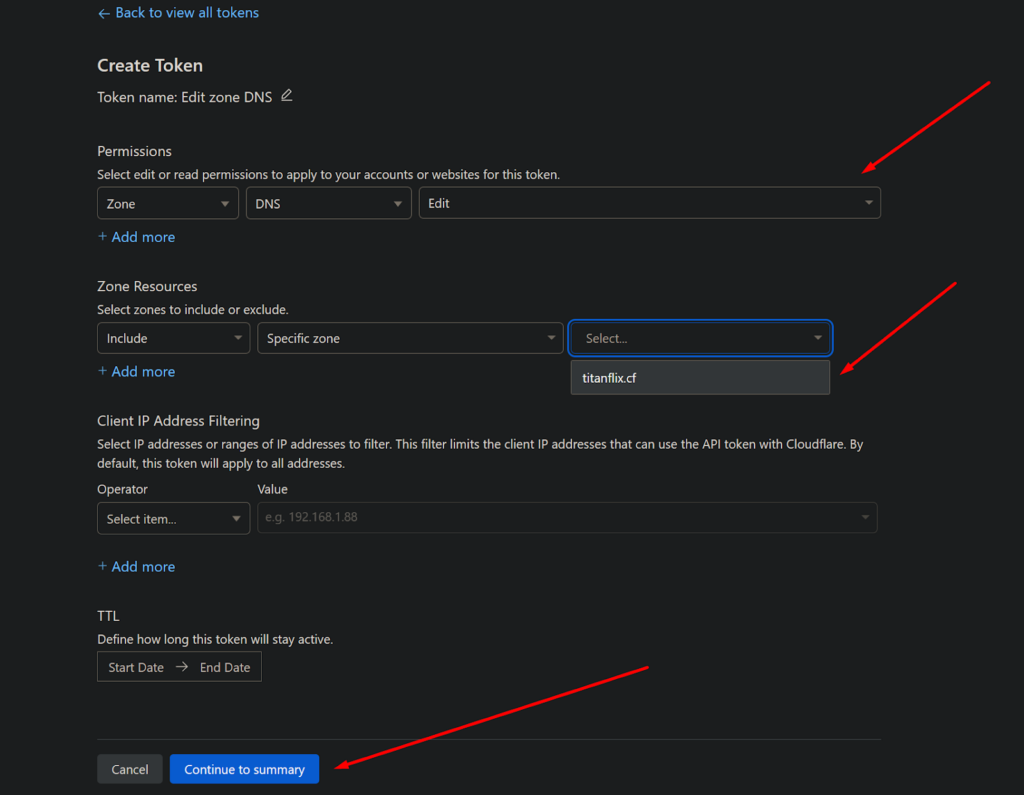
On the next page, set the permissions to Edit, Select the domain you want to use for QUIC.cloud, and click the Continue to summary button.
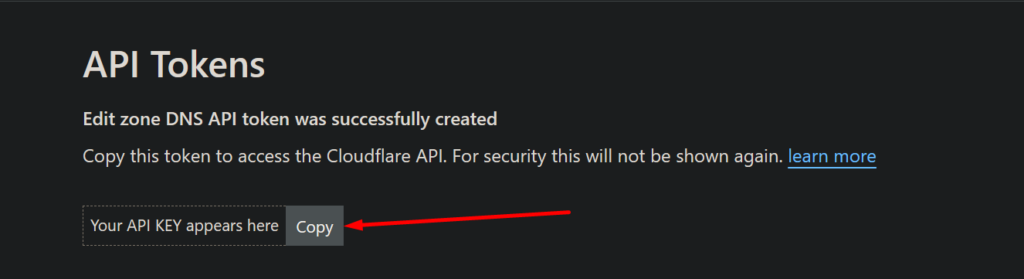
And finally, click Create Token and copy the created API token to your clipboard by pressing the Copy button.
Note: This API token only appears once. Please ensure that you copy it, otherwise you may have to recreate your token again.
At QUIC.cloud
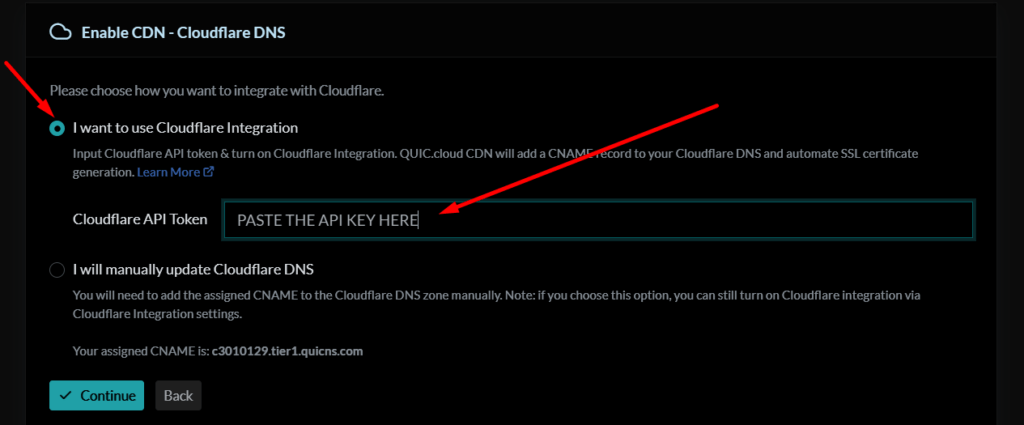
Once you have copied the API token, go back to my.quic.cloud, and paste it into the Cloudflare API Token setting. Click the Continue button.

And voila, now the connection between QUIC.cloud CDN and Cloudflare DNS should be complete. You should see a message like this on my.quic.cloud side:
Cloudflare API connection verified, Cloudflare Integration turned on.
Within a minute or so, QUIC.cloud will attempt to change the DNS records at Cloudflare automatically for you and set up QUIC.cloud CDN.
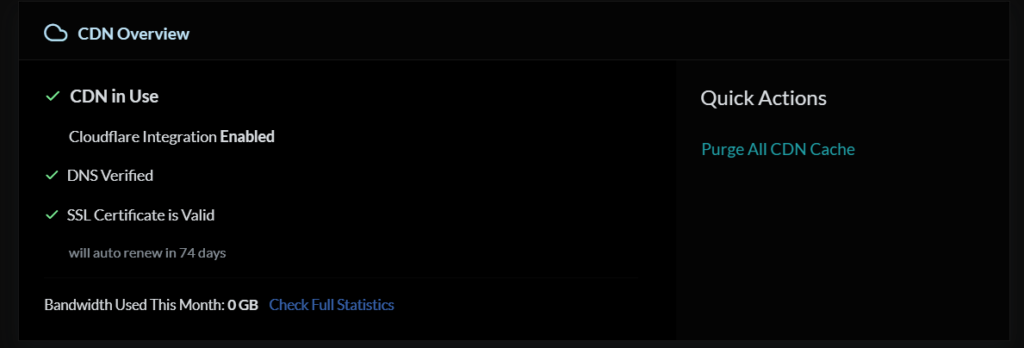
You may view the status in the DNS Status section at my.quic.cloud.
Once the DNS is verified, you will see that the CDN is working in the Summary section on my.quic.cloud.
Step 4: Verify QUIC.cloud is Working Properly
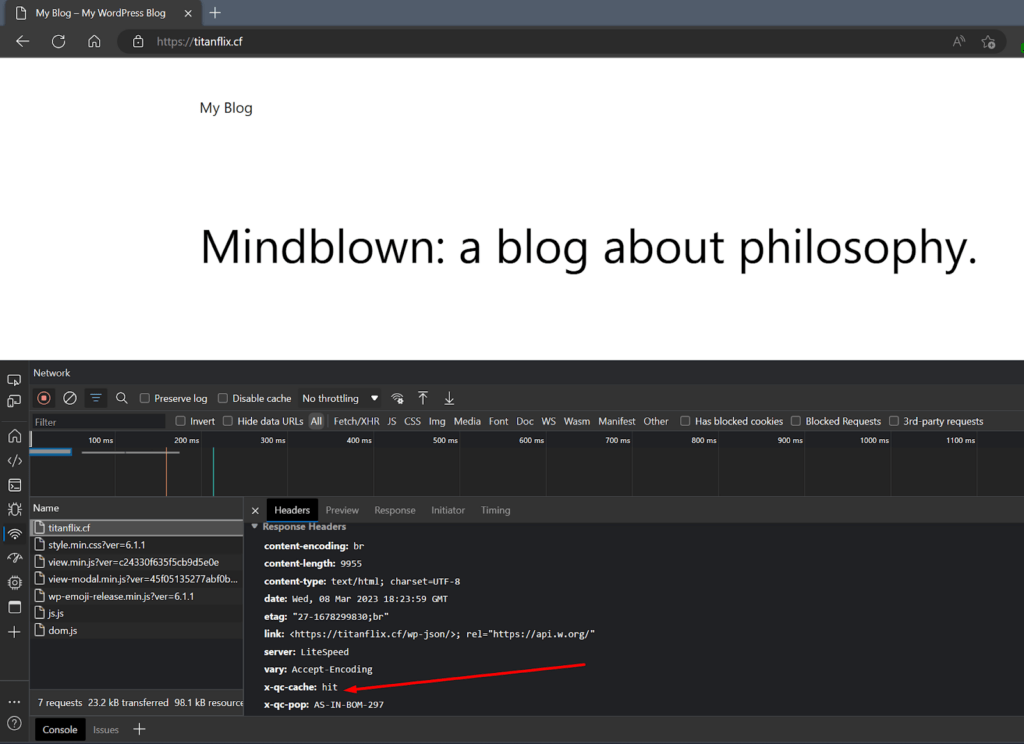
The presence of the x-qc-cache and x-qc-pop headers confirms that the website is using QUIC.cloud CDN.

And guess what: the TTFB for this website is now down to 24ms from 231ms. That is a 10x improvement in TTFB!
Conclusion
We built QUIC.cloud with WordPress performance in mind. Our CDN is now compatible with one of the biggest DNS providers in the world, and that’s a nice bonus for users looking to make their websites load QUIC-er!
Please do not hesitate to contact our support team if you run into any questions, or doubts while setting up QUIC.cloud. We’re all ears!
Cloudflare is a free. Quic Cloud is not free. Yes, you provide some credit but it is not sufficient. Your free plan is so bad for free user because you don’t have any pop in asia region. Make sure you atleast have one server in Asia in free plan(Mumbai or Bangalore is a good option).
Hi Mukesh,
Thank you for your comment. Bandwidth charges are quite different all over the world, with India(and Asia overall) being one of the places where it is most expensive. As such, it might not be possible to provide Unlimited Free Bandwidth with PoP’s in India currently. However, I’ve noted your feedback and we will try to do this, whenever it is possible.
We also provide far more performance and TTFB benefits out-of-the-box than what Cloudflare can with WordPress 🙂
Best Regards
Shivam
i went from 220 to 930 xd
Hi,
I apologize for the issue, You must be comparing the TTFB for an un-cached page vs a cached page, quic.cloud will only improve your cached response timings by bringing cached copies closer to your visitors 🙂
Please do not hesitate to contact our support team from the “Help” section on the top of this page, if you do keep having this issue.
Hope this helps
Shivam
Quick has routing issue, delivering content from EU London PoP instead of Mumbai. Facing issue with only Mumbai data center. Raised ticket but still not get any solution. About 50% bandwidth delivered from London today, but looking that you are not serious about this.
Hi Mukesh,
Unfortunately, the Free Plan does not include access to the Indian Datacenters, you may consider using our Standard Plan, and incase you still have the issue, please do reach out to our support team and we’ll be happy to help.
Best Regards
Shivam
It does not redirect my urls from example.com to http://www.example.com, how do I make the redirection work? I already modified the .htaccess
Hi,
Thank you for your reply, Unfortunately, it won’t be possible for us to determine what is causing your redirect to not work, with this limited information. You may consider reaching out to your system administrator or Hosting Provider for help.
Best Regards
Shivam
Both quic and cloud have their own merits and demerits. One notable aspect is one is not free and another can be free.
Both Cloudflare and QUIC.cloud have free plans.
There are so many comments about whether this is free or not 🙄
Cloudflare is free, use that then.
QUIC.cloud is NOT free, use this if you want high performance for not to expensive price.
If you focus on quality instead of price, it makes sense. if you focus on price over quality, use Cloudflare x Super Page Cache x FlyingPages x Perfmatters.
So I took this advice last year and my page speeds did not improve. I’m still seeing issues with serving unused css and js. How do I fix this issue?
Please contact our support team (
support@quic.cloud) and they should be able to see what might be going on!Will do – thanks!!