
What is DNS?
The domain name system (DNS) was built to function as the address book of the internet. It essentially maps human readable domain names such as example.com to IP addresses that computers understand, such as 8.8.8.8. In essence the primary function of DNS servers is to translate domain names to IP addresses and vice versa. QUIC.cloud not only operates as a content delivery network for websites but also provides DNS functionality. This allows you to manage DNS and CDN settings for your website on a single easy to use Dashboard.
Authoritative DNS vs. Recursive DNS
It is important to understand the difference between an authoritative DNS server and a recursive DNS resolver. An authoritative DNS server is responsible for maintaining the records of a domain name, while a recursive DNS resolver is responsible for finding the IP address associated with a domain name. An authoritative DNS server stores the information about domains and their associated IP addresses, while a recursive DNS resolver helps to locate and retrieve this information from other servers on the internet.
This diagram shows the route a simple DNS query for www.example.com takes:
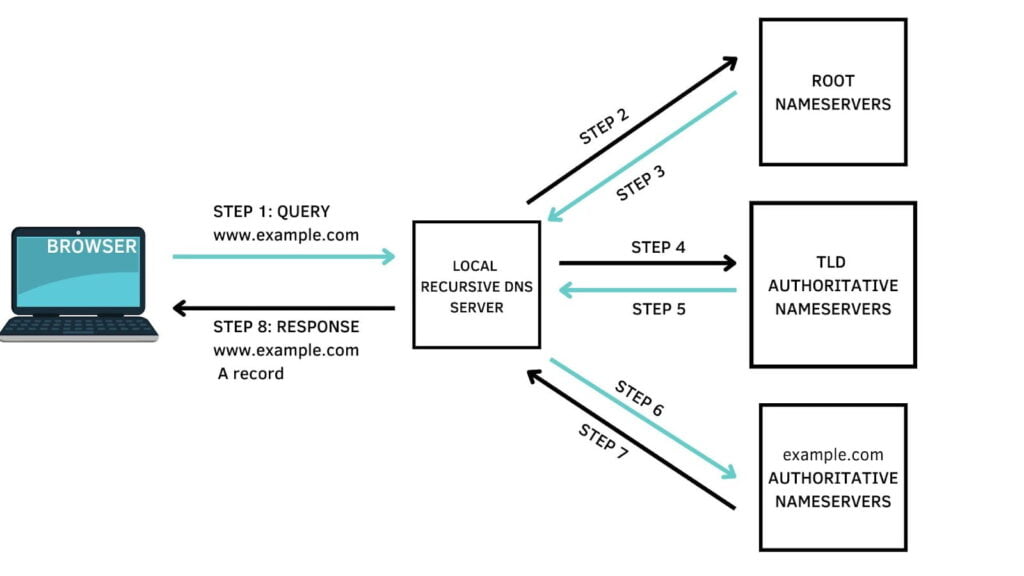
That is:
- Step 0: You open your browser and try to visit
www.example.com. - Step 1: The browser sends a DNS query to the local recursive DNS server.
- Step 2: The local DNS server, which is preconfigured with a list of root nameservers, randomly selects one of these root nameservers and sends an interactive DNS query for the
.comzone. - Step 3: The root nameserver responds with a list of authoritative nameservers for the
.comzone and their IP addresses. - Step 4: The local DNS server randomly selects one of the servers returned in step 3 and sends another DNS query for the root domain
example.com. - Step 5: The top level domain (TLD) nameserver responds with a list of nameservers that are authoritative for the root domain
example.com. - Step 6, The DNS server randomly selects one of the authoritative nameservers returned in step 5 and sends another DNS query for
www.example.com. - Step 7: The nameserver receiving the query responds with the IP address for
www.example.comto the web browser. - Step 8: The browser uses the IP address to display your requested content from
www.example.com.
How QUIC.cloud DNS works
QUIC.cloud DNS is an Authoritative Nameserver. QUIC.cloud DNS takes advantage of two major technologies to maximize the performance for DNS queries: AnyCAST and Geolocation.
- QUIC.cloud utilizes AnyCAST to return the fastest Authoritative Nameserver. When the recursive DNS server needs to send a request to the authoritative DNS server, the authoritative DNS server is identified by an IP address. QUIC.cloud DNS has servers throughout the world. This is where AnyCAST comes into play. AnyCAST enables QUIC.cloud to assign a single IP address to all of its DNS servers and depending on where the recursive DNS server is located, the request will route to its closest authoritative DNS server.
- QUIC.cloud utilizes DNS request information and IP Geolocation to send browsers to the correct QUIC.cloud CDN server. The QUIC.cloud CDN is built on a large network of interconnected Points of Presence (PoP’s) spread across multiple regions around the world. The DNS request includes the IP of the requesting recursive DNS server. It may optionally include an IP range indicating the general location of the requesting browser. This IP range is known as the EDNS Client Subnet. QUIC.cloud DNS will use the best IP available and Geolocation to return the IP address of the nearest CDN PoP. This results in much faster page load times and content delivery to your website’s end users.
Managing DNS in QUIC.cloud
In the QUIC.cloud dashboard, we built a page that allows you to create and manage DNS related information for your domain. On the DNS Zones tab you can create and edit DNS records for your domains, modify values associated with DNS records such as changing the IP address of the A record for your domain and more.
Before we begin looking at common DNS management tasks, let’s look at the three distinct places where these tasks are performed:
- The QUIC.cloud DNS Zone – this is the area in the QUIC.cloud Dashboard where your DNS records live after you create the zone for your domain.
- Your previous DNS provider – this is where your DNS records lived before they were migrated to QUIC.cloud. Usually DNS records are with your hosting provider, but they don’t have to be, if you moved them elsewhere at any time.
- Your domain registrar – this is where your domain is registered. Sometimes it is the same as your hosting provider, but often it is not. This is the provider to whom you pay your domain name fees.
Create the DNS Zone
If DNS for your domain is not already being managed by QUIC.cloud, this is how you set it up.
- Click the +Add New Domain to DNS Zones link.
- Enter your domain name and press the Add Domain button.
QUIC.cloud will attempt to detect your current DNS records. This may take a few minutes. Once detection is complete, you will be asked to confirm that your DNS information is correct. Accept all of the detected records, or uncheck any that you no longer need, and click the + Enable and Add Records button.
Import Missing DNS Records
It’s a good idea to verify that all of your DNS records have been properly migrated over from your previous DNS provider. Below is an example of how to do this for DNS that was hosted on GoDaddy. The process is similar for any other DNS provider:
In your GoDaddy account navigate to My Account > Domains. Select your domain name, click DNS and Manage Zones. View your DNS records and verify that they are the same as those detected by QUIC.cloud.
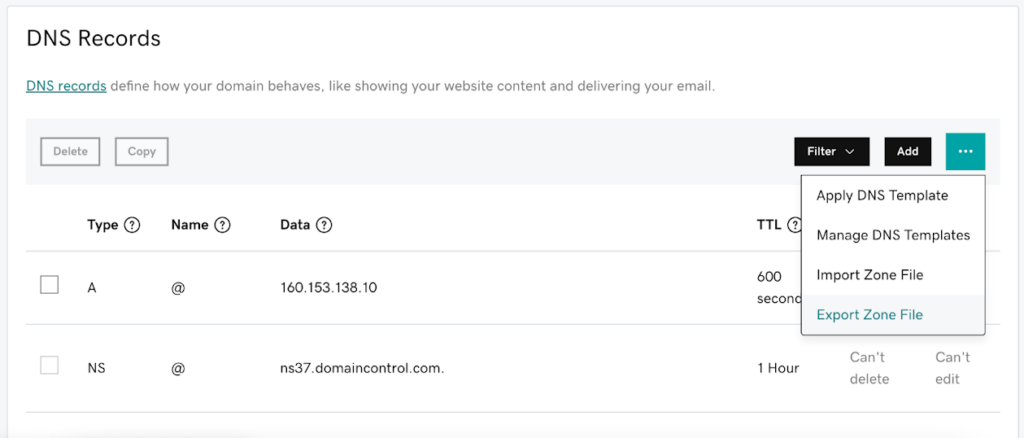
If any necessary GoDaddy DNS records are missing in QUIC.cloud, you can use our new tool to import them. First, while still on your GoDaddy account page, click the menu icon on the right and click Export Zone File. This will download a text file with a BIND configuration for your DNS records.
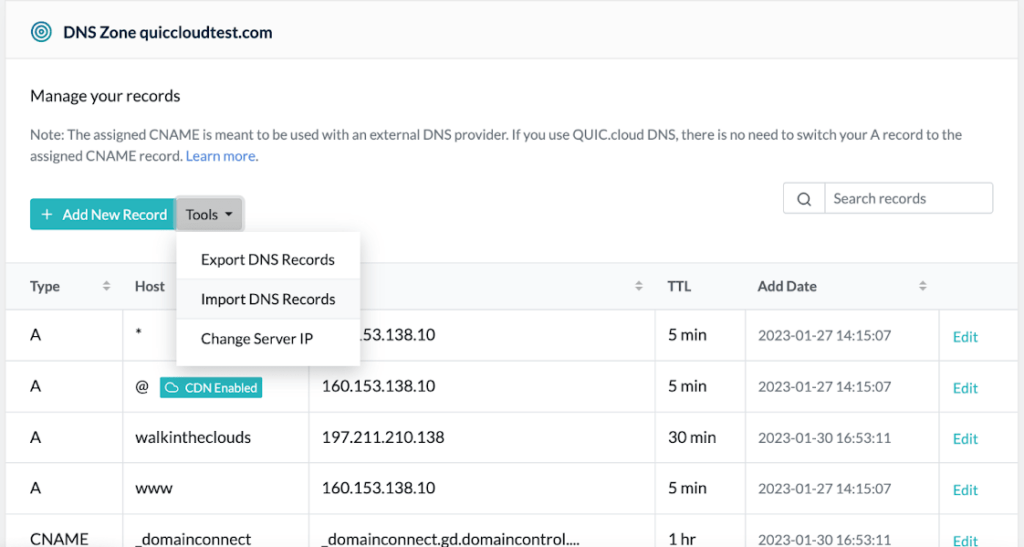
Back in the QUIC.cloud DNS Zones area, click Tools > Import DNS Records.
Click the Browse button to select the text file that you downloaded from GoDaddy and click Import. QUIC.cloud will add any missing DNS records it finds in the import file, but will not replace or update any records that already exist in your DNS Zone.
Create a DNS Record
To manually create a DNS record in the DNS Zone, click Add New Record. A form will be displayed asking you to select the type of record that you would like to create. Enter the requested information and click Add Record.
QUIC.cloud DNS currently supports the following record types:
CNAMEAAAAACAANSMXSRVTXT
Modify a DNS Record
If you would like to modify an existing record, click on the Edit link on the record. A form will be displayed below the record prompting you to type in or select your desired changes. Once you make your changes click on Save Record.
Please note, if the CDN is enabled, you cannot directly update the IP address for an A record. To update the IP for an A record, you can either bypass the CDN first, or update the server IP from the Settings tab. If you choose the latter option, QUIC.cloud will automatically update the IP for all related A records.
Delete the DNS Zone.
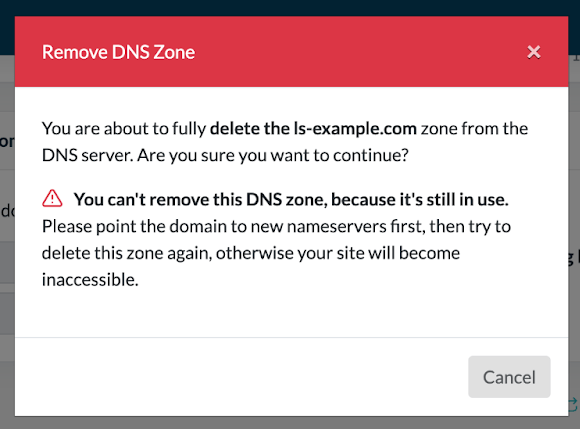
If you attempt to delete a DNS Zone without updating your nameservers, you will see the error message:
You can’t remove this DNS zone, because it’s still in use. Please point the domain to new nameservers first, then try to delete this zone again, otherwise your site will become inaccessible.
To successfully delete a DNS Zone, sign into your user account on your domain registrar. Open the settings page for your domain and remove the QUIC.cloud nameservers. Add the default nameservers for your domain registrar and save your changes. On the QUIC.cloud DNS Zones tab scroll to the bottom section of the page and click Delete zone.
Configure QUIC.cloud Nameservers
Before you can use QUIC.cloud DNS, you must instruct your domain registrar where to find the DNS for your domain. You’ll do this with nameservers.
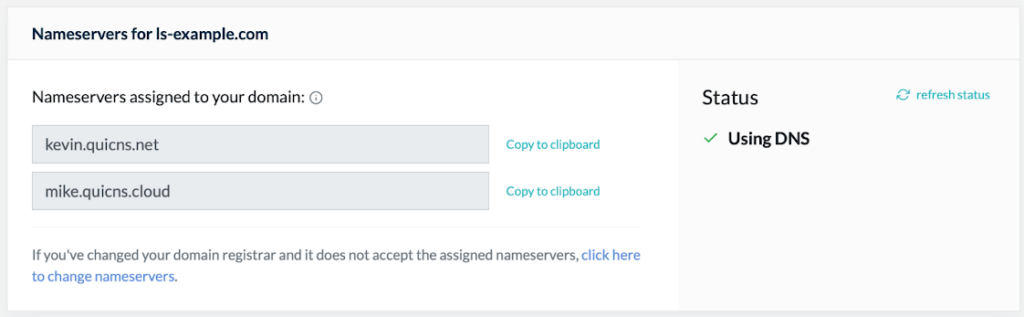
In the DNS Zone for your domain, you will see information about nameservers assigned to you. This box will be at the top of the page, if you haven’t yet set up your nameservers at your domain registrar. If this configuration is complete, you’ll see the box at the bottom of the page.Click refresh status if you want to verify that your nameservers are pointing to QUIC.cloud.
The following is an example of how to configure QUIC.cloud nameservers on a domain registered with GoDaddy. The setup process flow is similar for any other domain registrar.
To update your nameservers, navigate to My Account > Quick Links > Domains. Select your domain in the Domain Portfolio and click More.
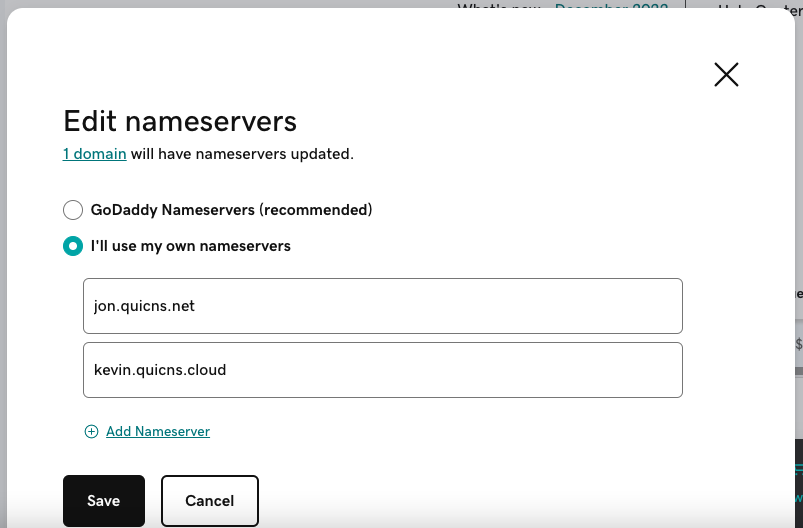
Click Edit nameservers and I’ll use my own nameservers. Enter the two nameservers that QUIC.cloud has provided into the Nameserver 1 and Nameserver 2 fields. If there are any other nameserver fields populated, clear them. Click Save and then Continue, to apply changes.
Conclusion
And that’s it! You have learned how DNS works and how to manage DNS in QUIC.cloud. If you face problems configuring QUIC.cloud DNS for your domain, we encourage you to check our knowledge base.
[Editor’s note: This article was written by Philani Gumbo. -LC]